
Cuando se trata de hacer selecciones en Photoshop, en realidad hay dos tipos de personas: las que saben cómo usar la herramienta Pluma y las que luchan. La mayoría de las personas posponen aprender a usar la herramienta Pluma durante el mayor tiempo posible, mientras que otras nunca llegan a aprenderla, creyendo que es demasiado confusa, demasiado complicada y simplemente antinatural.
En última instancia, su trabajo en Photoshop lo sufre, ya que están atrapados confiando en la herramienta Lazo para casi todo lo que no pueden seleccionar con las herramientas de marco rectangular o elíptico. En este tutorial de Adobe Photoshop, vamos a poner fin al sufrimiento. Aprenderemos lo fácil que es hacer selecciones con la herramienta Pluma.
Ahora, cuando digo "fácil", no me refiero a que va a leer este tutorial y se transformará instantáneamente en un Pen Master. Aprender a usar la herramienta Pluma es muy parecido a aprender a andar en bicicleta. Una vez que hayas aprendido, parecerá completamente natural y te preguntarás cómo alguien podría no saber cómo usar algo tan simple. Pero llegar a ese punto requiere un poco de práctica y esfuerzo, y si bien leer cada libro sobre cómo andar en bicicleta puede enseñarle los fundamentos de cómo funcionan los pedales, las marchas y los frenos, no es hasta que esté en la bicicleta luchando. para mantener el equilibrio que comienza el verdadero aprendizaje.
Una de las mejores cosas de Pen Tool es que no es algo exclusivo de Photoshop. ¡Lejos de ahi! Prácticamente todos los programas populares de edición de fotos, gráficos y diseño de páginas utilizan la herramienta Pluma de una forma u otra, por lo que una vez que haya aprendido cómo usarla en Photoshop, ya tendrá una buena comprensión de cómo usarla en muchos ¡otros programas también!
¿Dónde encuentro la herramienta Pluma?
Antes de comenzar a hablar sobre qué es la herramienta Pluma o cómo usarla, primero debemos buscar dónde encontrarla en Photoshop. Encontrará la herramienta Pluma en la paleta Herramientas, agrupada con las Herramientas de forma, la Herramienta Tipo y la Selección de ruta (la flecha blanca) y las Herramientas de selección directa (la flecha negra) (vea la imagen a la izquierda).
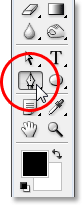
Herramienta de lápiz de Photoshop
Por supuesto, esto puede plantear la pregunta de por qué, si podemos hacer selecciones con la herramienta Pluma, ¿no se agrupa con las otras herramientas de selección (la herramienta Marco rectangular, la herramienta Marco elíptico, la herramienta Lazo, etc.) en la parte superior de la paleta de herramientas? ¿Por qué está ahí abajo con esas otras herramientas que claramente no son herramientas de selección?
Esa es una excelente pregunta, y resulta que hay una respuesta igualmente excelente para acompañarla, a la que llegaremos en un momento.
¿Por qué se llama la herramienta "Pluma"?
Uno de los primeros escollos para aprender a usar la herramienta Pluma, como ocurre con muchas otras cosas en Photoshop, es su nombre, ya que, después de todo, si hay algo que todos los que han intentado usar saben, esto no es un bolígrafo. Al menos, no es el tipo de bolígrafo en el que normalmente pensarías cuando escuches la palabra "bolígrafo". Intenta escribir tu nombre con él de la misma manera en que firmarías tu nombre en un trozo de papel con un bolígrafo y probablemente terminarás con un desorden retorcido y enredado y cosas que se superponen entre sí (por supuesto, supongo que bien podría ser cómo firmas tu nombre).
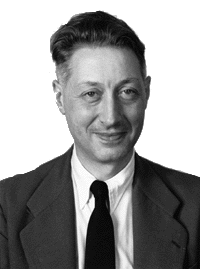 Pierre Bezier
Entonces, si no actúa como una pluma de tinta tradicional, ¿por qué se llama la herramienta Pluma? La herramienta Pluma en realidad se ha llamado varias cosas a lo largo de los años, y con eso, no me refiero al tipo de cosas que puede haber llamado en momentos de frustración. Es posible que haya escuchado que se conoce como el Bézier Pen o la Herramienta Bezier, y eso es porque fue creado por un hombre llamado Pierre Bezier (ese es él a la izquierda), un ingeniero francés y un tipo inteligente que se le ocurrió la idea. Matemáticas elegantes que potencian la herramienta mientras trabajan para la compañía de automóviles Renault (la herramienta Pluma fue creada originalmente para ayudar a diseñar automóviles).
También es posible que haya escuchado que la herramienta Pluma se conoce como la herramienta de rutas, y ese es realmente el nombre más apropiado para ella. La herramienta Pluma se trata de dibujar "trazados". Para hacer selecciones con la herramienta Pluma, simplemente convertimos la ruta o rutas que hemos dibujado en selecciones. Sin embargo, siempre comienza con un camino.
Complemento de códigos cortos, acciones y filtros: error en shortcode (ads-basics-middle-2)
¿Qué es un camino?
Un "camino" es, honestamente, algo que puede parecer un poco fuera de lugar dentro de un programa como Photoshop. La razón es porque Photoshop es principalmente un programa basado en píxeles . Toma los millones de pequeños píxeles cuadrados que forman una imagen digital típica y hace cosas con ellos. Las rutas, por otro lado, no tienen absolutamente nada que ver con los píxeles, por lo que dije que pueden parecer fuera de lugar en un programa que se usa principalmente para editar y dibujar píxeles.
Una ruta realmente no es más que una línea que va de un punto a otro, una línea que es completamente independiente y no le importan los píxeles que se encuentran debajo. La línea puede ser recta o puede ser curva, pero siempre va de un punto a otro, y como mencioné, no tiene nada que ver con los píxeles de la imagen. Un camino está completamente separado de la imagen misma. De hecho, una ruta es tan separada que si intenta imprimir su imagen con una ruta visible en su pantalla, la ruta no aparecerá en el papel. Además, si guardó su imagen como un archivo JPEG.webp y la cargó en un sitio web, incluso si guardó la imagen con la ruta visible en su pantalla en Photoshop, no la verá en la imagen del sitio web. Los caminos son solo para tus ojos y Photoshop. Nadie más los verá, a menos que pasen junto a su computadora mientras trabaja.
Siempre necesitamos un mínimo de dos puntos para crear una ruta, ya que necesitamos saber dónde comienza y dónde termina la ruta. Si usamos suficientes puntos para que nuestra ruta vuelva al mismo punto desde el que comenzó, podemos crear diferentes formas a partir de las rutas, que es exactamente cómo funcionan las diversas herramientas de forma de Photoshop. La herramienta Rectángulo utiliza trazados, conectados por puntos, para dibujar una forma rectangular. La herramienta Elipse utiliza trazados, conectados por puntos, para dibujar una forma elíptica, y así sucesivamente. También es la forma en que funciona la herramienta Tipo de Photoshop, aunque Photoshop maneja el tipo de letra de manera un poco diferente a la que maneja las formas regulares, pero todo el tipo en Photoshop se hace esencialmente a partir de trazados. De hecho, puede convertir el tipo en formas, lo que le brinda las mismas opciones de edición de ruta con el tipo que obtiene cuando trabaja con formas.
También puede haber escuchado rutas denominadas contornos, y esa es una descripción bastante buena de lo que es una ruta, o al menos, lo que puede ser una ruta. Podemos dibujar un camino cuadrado, y si no hacemos nada más con él, ya que no lo rellenamos con un color ni le aplicamos un trazo, entonces todo lo que tenemos es un contorno básico de un cuadrado. Lo mismo con un círculo o cualquier otra forma que dibujemos. El camino en sí mismo es solo el contorno de la forma. No es hasta que hacemos algo con la ruta, como rellenarlo, aplicar un trazo o convertirlo en una selección, que la ruta se convierte en algo más que un esquema básico.
Puede seleccionar una ruta completa con la Herramienta de selección de ruta (también conocida como la herramienta "flecha negra"), o puede seleccionar puntos individuales o segmentos de ruta con la Herramienta de selección directa (la herramienta "flecha blanca"). Un "segmento" de ruta, o "segmento de línea" como a veces se le llama, es cualquier ruta entre dos puntos. Una ruta rectangular, por ejemplo, estaría compuesta por cuatro puntos (uno en cada esquina), y las rutas individuales que conectan los puntos a lo largo de la parte superior, inferior, izquierda y derecha para crear la forma del rectángulo son los segmentos de ruta. . La ruta en sí misma es la combinación de todos los segmentos de ruta individuales que conforman la forma.
Eso puede ser un poco confuso, así que veamos a qué me refiero. Abra un nuevo documento dentro de Photoshop. No importa de qué tamaño sea. Elegiré el tamaño 640x480 de la lista de ajustes preestablecidos, pero como dije, no importa qué tamaño elijas. Seleccione su herramienta Pluma de la paleta Herramientas. También puede seleccionar la herramienta Pluma simplemente presionando la letra P en su teclado.
Los dos modos de herramienta de pluma
Ahora, antes de continuar, primero debemos asegurarnos de que estamos trabajando con rutas, y eso se debe a que la herramienta Pluma en realidad tiene dos modos diferentes en los que puede funcionar, y de manera predeterminada, usa el otro. Con la herramienta Pluma seleccionada, si buscamos en la barra de opciones en la parte superior de la pantalla, veremos un grupo de tres iconos:

La barra de opciones en Photoshop muestra el grupo de tres iconos que representan cada uno de los tres modos de la herramienta Pluma.
Sé que dije que hay dos modos en que la herramienta Pluma puede funcionar y, sin embargo, como para hacer las cosas más confusas, hay tres íconos, pero el ícono de la derecha, que es el ícono de píxeles de relleno, está atenuado y no está disponible cuando se trabaja con la herramienta Pluma. Solo está disponible cuando se trabaja con varias herramientas de forma, por lo que en realidad solo hay dos íconos que debemos mirar.
El ícono a la izquierda es el ícono de las capas de Forma, también conocido como "no el que queremos", y es el que está seleccionado por defecto. Si tuviéramos que trabajar con la herramienta Pluma con ese icono seleccionado, estaríamos dibujando formas, como si estuviéramos usando cualquiera de las diversas herramientas de formas, excepto que en lugar de dibujar una forma predefinida como un rectángulo o una elipse, Podríamos dibujar cualquier forma que quisiéramos. Sin embargo, como dije, eso no es lo que queremos. Queremos el ícono al lado, el ícono de Rutas, así que adelante y haga clic en él para seleccionarlo:

Tutoriales de Photoshop: haga clic en el icono "Rutas" en la barra de opciones para trabajar con rutas con la herramienta Pluma.
Con la herramienta Pluma seleccionada y el icono de rutas seleccionado en la barra de opciones, haga clic una vez en cualquier lugar dentro de su documento. No haga clic y arrastre, solo haga clic. Cuando lo haga, agregará un pequeño punto cuadrado. Lo he ampliado aquí:

Haga clic una vez dentro del documento con la herramienta Pluma para agregar un punto.
Este primer punto que acabamos de agregar es el punto de partida de nuestro camino. Ahora en este momento, en realidad no tenemos un camino. Todo lo que tenemos es un punto de partida. El "punto" técnicamente se llama ancla o punto de anclaje, y se llama así porque ancla la ruta en su lugar. Este primer punto anclará el comienzo de la ruta a este punto dentro del documento. A medida que agreguemos más puntos, cada uno de ellos anclará el camino en su lugar en esa ubicación.
Agreguemos otro punto. Haga clic en otro lugar dentro del documento. Cualquier lugar lo hará. Voy a hacer clic en algún lugar a la derecha de mi punto inicial:

Tutoriales de Photoshop: agregue un segundo punto de anclaje haciendo clic en otro lugar dentro del documento.
Ahora he agregado un segundo punto de anclaje y mira lo que sucedió. ¡Ahora tengo una línea recta que une los dos puntos! Esa línea recta es mi camino. Como mencioné anteriormente, necesitamos un mínimo de dos puntos para crear una ruta, ya que necesitamos saber dónde comienza y dónde termina la ruta, y ahora que tenemos un punto inicial y uno final, Photoshop pudo conectar el dos puntos juntos, creando nuestro camino.
Agreguemos algunos puntos más solo por diversión. Haga clic varias veces más en diferentes puntos dentro del documento. Nuevamente, no haga clic y arrastre, solo haga clic en:
Agregue puntos adicionales haciendo clic en diferentes puntos dentro del documento.
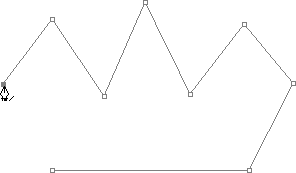
En la imagen de arriba, agregué siete puntos de anclaje más haciendo clic en diferentes puntos con la herramienta Pluma, y cada vez que agregué uno, la longitud de mi ruta aumentó porque se agregó un nuevo "segmento" de ruta entre el punto anterior y El nuevo punto. Mi camino ahora consta de nueve puntos de anclaje y ocho segmentos de camino. Podría seguir haciendo clic dentro del documento para agregar más puntos de anclaje y segmentos de ruta, pero lo que realmente me gustaría hacer ahora es cerrar mi ruta para que se forme una forma completa.
Cerrando un camino
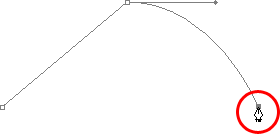
Para cerrar una ruta, todo lo que tenemos que hacer es hacer clic una vez más en nuestro punto de partida inicial. Cuando pase el cursor del mouse sobre el punto de partida, verá un pequeño círculo en la esquina inferior derecha del icono del lápiz:

Aparece un pequeño círculo en la esquina inferior derecha del ícono del lápiz al pasar el cursor sobre el punto inicial de la ruta.
Ese círculo nos dice que estamos a punto de hacer un "círculo completo" con nuestro camino, terminando donde comenzó. Para cerrarlo, simplemente haga clic directamente en el punto de partida.
Podemos ver a continuación que mi camino se ha convertido en un camino cerrado y ahora es un esquema básico de una forma:
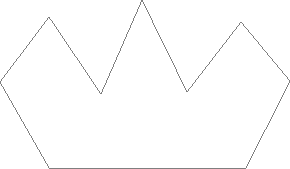
El camino ahora está cerrado, terminando en el punto de partida, creando un camino cerrado.
Aunque este camino se dibujó solo por diversión como un ejemplo de cómo dibujar un camino básico con la herramienta Pluma, puedo convertirlo fácilmente en una selección. Para eso, necesitamos la paleta Paths de Photoshop, y la veremos a continuación.
Convertir un camino en una selección
Hasta ahora, hemos visto qué es un camino y cómo dibujar un camino básico con la herramienta Pluma de Photoshop. Pero, ¿cómo haces para hacer una selección del camino?
¡Fácil! Hay un par de formas de convertir una ruta en una selección, incluido un práctico atajo de teclado, pero antes de ver la forma rápida, veamos la forma oficial. La "forma oficial" implica el uso de la paleta Paths de Photoshop, que encontrará agrupada con la paleta Layers y la paleta Channels:
Paleta de caminos de Photoshop.
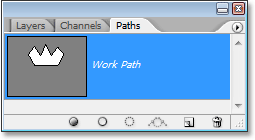
A primera vista, la paleta Paths se ve muy similar a la paleta Layers de Photoshop, y Adobe lo hizo a propósito para que se sienta más cómodo al usarla. Podemos ver una vista previa en miniatura de la forma de la ruta que acabamos de crear y, de forma predeterminada, Photoshop nombra la ruta "Ruta de trabajo", que es básicamente una forma elegante de decir "temporal", como si fuera a crear una diferente ruta ahora sin renombrar esta ruta a otra cosa primero, esta sería reemplazada por la nueva ruta. Solo puede tener una "Ruta de trabajo", por lo que si desea conservarla, deberá hacer doble clic en su nombre en la paleta de Rutas y asignarle un nombre diferente antes de crear una nueva ruta.
Como mi ruta se parece un poco a una corona, voy a hacer doble clic en el nombre "Ruta de trabajo", que aparece el cuadro de diálogo Guardar ruta de Photoshop, y voy a cambiar el nombre de mi ruta "Corona":

Puede guardar una "Ruta de trabajo" temporal simplemente cambiándola de nombre.
Haré clic en Aceptar cuando termine, y ahora, si vuelvo a mirar en mi paleta de Rutas, puedo ver que, efectivamente, mi "Ruta de trabajo" ha pasado a llamarse "Corona":
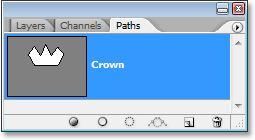
La paleta de rutas que muestra que la ruta ha sido renombrada "Corona".
Al renombrarlo, la ruta ahora se guarda y no desaparecerá en mí si voy a crear una nueva ruta. Además, todas las rutas guardadas se guardan con el documento de Photoshop, por lo que ahora, si guardo mi documento, la ruta se guardará con él y la próxima vez que abra el documento, la ruta seguirá allí en la paleta Rutas.
Guardar un camino no es algo que deba hacer para convertirlo en una selección. En la mayoría de los casos, cuando use la herramienta Pluma para hacer selecciones, no necesitará la ruta una vez que haya hecho una selección, por lo que no habrá necesidad de guardarla. Sin embargo, si desea guardarlo, simplemente cámbiele el nombre a otro que no sea "Ruta de trabajo" y se guardará.
Para convertir la ruta en una selección, si miramos la parte inferior de la paleta de Rutas, podemos ver varios iconos. Estos íconos nos permiten hacer cosas diferentes con nuestro camino. El primer ícono a la izquierda es la ruta Relleno con el ícono de color de primer plano y, como su nombre lo indica, hacer clic en él llenará nuestra ruta con nuestro color de primer plano actual. Interesante, pero eso no es lo que queremos. El segundo icono de la izquierda es la ruta de Trazo con el icono de pincel, que aplicará un trazo a nuestra ruta usando cualquier pincel que hayamos seleccionado actualmente.
Esta es una excelente manera de crear efectos interesantes en Photoshop, pero por lo que estamos haciendo aquí, convertir un camino en una selección, tampoco es lo que queremos. El que queremos es el tercer icono de la izquierda, la ruta de carga como un icono de selección:
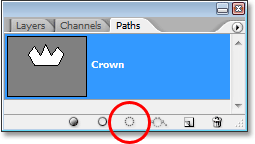
El icono "Cargar ruta como una selección" en la parte inferior de la paleta de Rutas.
Tan pronto como hago clic en este icono, mi ruta dentro de mi documento se convierte en una selección, como si lo hubiera creado usando cualquiera de las herramientas de selección más comunes de Photoshop:
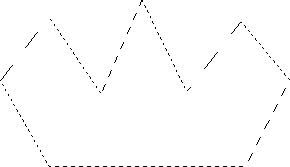
El camino ahora se ha convertido en una selección.
¡Es fácil! De hecho, es aún más fácil que eso porque hay un atajo de teclado para convertir una ruta en una selección sin tener que cambiar a la paleta de rutas. Cuando haya dibujado su ruta y esté listo para convertirla en una selección, simplemente presione Ctrl + Entrar (Win) / Comando + Retorno (Mac) para que Photoshop convierta la ruta en una selección.
A estas alturas, puede ser un poco más obvio para usted por qué, aunque la herramienta Pluma es una herramienta de selección, no está agrupada con las otras herramientas de selección en la parte superior de la paleta Herramientas. La razón es porque la herramienta Pluma es principalmente una herramienta de ruta. Crea selecciones creando primero rutas, y por esa razón, tiene más en común con las diversas Herramientas de forma y la Herramienta de tipo, todas las cuales usan rutas, que con las herramientas de selección básicas como la Herramienta de marco rectangular o Lazo Herramienta, que realiza selecciones basadas solo en píxeles.
Veamos un ejemplo práctico de lo que hemos aprendido hasta ahora. Aquí tenemos una foto de una señal de stop frente a unos acantilados rocosos:

Una foto de una señal de stop.
Digamos que quería seleccionar esa señal de stop para poder copiarla en su propia capa. La señal de stop se compone de nada más que una serie de líneas rectas, lo que hará que esto sea extremadamente fácil. Primero, necesito un punto de partida para mi camino, así que comenzaré en la esquina superior izquierda de la señal haciendo clic una vez para colocar un punto de anclaje inicial. En este caso, realmente no importa dónde empiezo el camino, pero comenzaré en la esquina superior izquierda:
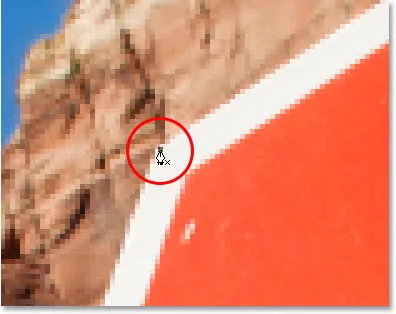
Al hacer clic una vez en la esquina superior izquierda de la señal de stop para comenzar la ruta con un punto de anclaje inicial.
Observe cómo hago zoom aquí cuando hago clic. Le resultará más fácil hacer selecciones con la herramienta Pluma para acercar un poco su imagen. De esa manera, puede estar seguro de que está manteniendo su camino justo dentro del área que desea seleccionar.
En este momento, no tengo un camino, solo tengo un punto de partida para mi camino. Para crear el camino, todo lo que necesito hacer es dar la vuelta al letrero agregando un punto de anclaje en cada esquina donde el camino necesita cambiar de dirección. A medida que agregue cada punto de anclaje, aparecerá un nuevo segmento de ruta que une el punto de anclaje anterior con el nuevo, hasta que haya recorrido todo el signo. Para cerrar la ruta, simplemente volveré a hacer clic en el punto de partida inicial. Es un poco difícil de ver en la captura de pantalla a continuación, pero ahora tengo un camino alrededor de la señal de stop completa, incluida la publicación a la que está adjunta, simplemente haciendo clic en las esquinas donde el camino debe cambiar de dirección:

Ahora aparece una ruta alrededor de la señal de stop en la imagen.
Si miro en mi paleta de Rutas ahora, puedo ver muy claramente que tengo una ruta en la forma de la señal de stop:
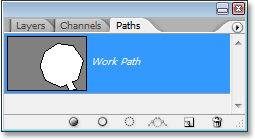
La paleta de rutas de Photoshop que muestra la ruta dibujada alrededor de la señal de stop.
Observe cómo Photoshop ha llamado a la ruta "Ruta de trabajo", lo que significa que esta ruta es temporal y la perderé si creo una ruta diferente sin guardarla primero al renombrarla. Incluso si no creo una nueva ruta, la perderé cuando cierre el documento a menos que la guarde primero. Sin embargo, no necesito guardar este camino, así que no me preocuparé por eso. En la mayoría de los casos, tampoco tendrá que preocuparse por eso.
Para convertir mi ruta en una selección, haré clic en Cargar ruta como un icono de selección en la parte inferior de la paleta Capas, o podría presionar Ctrl + Enter (Win) / Command + Return (Mac) con la misma facilidad:
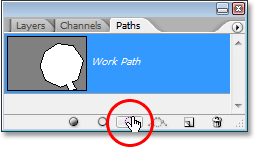
Haga clic en el icono "Cargar ruta como una selección" en la paleta de Rutas, o presione "Ctrl + Entrar" (Win) / "Comando + Eliminar" (Mac) para convertir la ruta en una selección.
Tan pronto como lo hago, mi ruta se convierte en una selección, y la señal de stop ahora está seleccionada:

La señal de stop ahora se selecciona después de convertir la ruta en una selección.
Volveré a mi paleta de capas, y para copiar la señal de stop en su propia capa, usaré el atajo de teclado Ctrl + J (Win) / Comando + J (Mac), que coloca el signo por sí mismo capa sobre la capa de fondo:
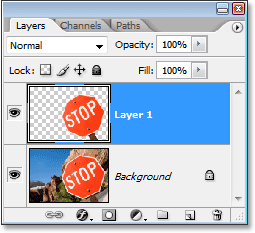
La señal de stop ahora se ha copiado en su propia capa separada.
Con el letrero ahora en su propia capa, puedo hacer lo que quiera con él, intercambiar el fondo con una imagen diferente o hacer que el fondo sea blanco y negro mientras dejo el letrero en color, lo que se me ocurra. El punto es que pude seleccionar fácilmente el signo haciendo clic en las esquinas con la herramienta Pluma, que creó un camino alrededor del signo, y luego simplemente convertí el camino en una selección.
Hasta ahora, en nuestro análisis de hacer selecciones con la herramienta Pluma en Photoshop, hemos aprendido que la Pluma es una herramienta de selección como las herramientas de selección más comunes de Photoshop como el Marco Rectangular y las Herramientas Lazo, pero eso en lugar de hacer selecciones basadas en píxeles como lo hacen esas otras herramientas, la herramienta Pluma dibuja rutas que luego se pueden convertir fácilmente en selecciones, ya sea desde la paleta de rutas o mediante el método abreviado de teclado rápido.
Es por eso que el lápiz no se encuentra en la parte superior de la paleta de herramientas con esas otras herramientas de selección basadas en píxeles, sino que se agrupa con las herramientas de ruta, como las diversas herramientas de forma, la herramienta de tipo y las herramientas de selección de ruta y selección directa . La herramienta Pluma tiene que ver con rutas, no con píxeles.
Hemos aprendido que podemos agregar puntos de anclaje dentro de nuestro documento, que fijan la ruta en su lugar, simplemente haciendo clic en diferentes puntos con la herramienta Pluma, y a medida que agregamos más y más puntos de anclaje, creamos una ruta como cada nuevo punto está conectado al punto anterior por un nuevo segmento de ruta. También hemos aprendido que una ruta es lo que generalmente se conoce como un "elemento no imprimible", lo que significa que no importa cuántas rutas agreguemos, ninguna de ellas será visible en el papel cuando imprimamos la imagen. . Tampoco serán visibles si mostramos la imagen en un sitio web. Las rutas solo son visibles para nosotros cuando trabajamos dentro de Photoshop (aunque otros programas como Adobe Illustrator también admiten rutas). No es hasta que hacemos algo con la ruta, como rellenarlo con un color, aplicarle un trazo o convertirlo en una selección, que la ruta se convierte en algo más que un contorno básico, no imprimible de una forma.
Vimos lo fácil que sería usar la herramienta Pluma para seleccionar algo como una señal de stop delineándola con una ruta formada por una serie de segmentos de ruta recta y luego convirtiendo la ruta en una selección. Eso es genial, pero realmente, aún no hemos hecho nada que no podríamos haber hecho más fácilmente con algo como la Herramienta Lazo, o incluso mejor, la Herramienta Lazo Poligonal que fue construida específicamente para seleccionar formas de lados planos como nuestro tope firmar. Lo más probable es que, a menos que tenga una extraña fascinación por las señales de tráfico, tarde o temprano querrá seleccionar algo un poco más interesante, y por "interesante" quiero decir más desafiante. Y por "desafiante", me refiero a algo que contiene curvas. La selección de un objeto curvo en Photoshop suele ser cuando te encuentras perdiendo el respeto por las herramientas básicas de selección. Afortunadamente, ¡también es el momento en que la herramienta Pluma realmente brilla!
Antes de continuar, debo señalar que todo lo que hemos hecho hasta este momento ha sido bastante simple. Haga clic aquí, haga clic allí, convierta la ruta en una selección, listo. La siguiente parte en la que nos adentramos en el dibujo de curvas no es tan simple, aunque ciertamente no es difícil, pero si es la primera vez que usa la herramienta Pluma o no tiene mucha experiencia, trabajar con curvas puede parecer una tarea difícil. poco natural e incluso un poco abrumador. Definitivamente, aquí es donde entra en juego la analogía de "andar en bicicleta". Puede caerse varias veces al principio y preguntarse cómo alguien logra hacerlo, pero cuanto más practique y más se apegue a ella, más sentido tendrá. comienza a hacer. En muy poco tiempo, te parecerá una segunda naturaleza y de repente entenderás por qué tanta gente jura que la herramienta Pluma es la mejor herramienta de selección en Photoshop. En serio, realmente lo es.
Conseguir un mango en mangos de dirección
Comencemos nuevamente con la herramienta Pluma. Abra un nuevo documento de Photoshop en blanco, o simplemente elimine lo que ha hecho hasta ahora en el documento existente para comenzar de nuevo. Luego, con la herramienta Pluma seleccionada y la opción Trayectorias seleccionada en la barra de opciones (recuerde, por defecto es la opción Capas de forma, por lo que deberá asegurarse de tener seleccionada la opción Trazados), haga clic una vez en cualquier lugar dentro de su documento, tal como Lo hicimos antes. Sin embargo, esta vez, en lugar de simplemente hacer clic para agregar un punto de anclaje, haga clic y luego arrastre el mouse a una corta distancia del punto de anclaje antes de soltar el botón del mouse:
Haga clic en cualquier lugar dentro del documento con la herramienta Pluma, luego arrastre una distancia corta del punto de anclaje.
Cuando haya terminado, verá un punto de anclaje con dos líneas que se extienden desde él. A primera vista, puede pensar que de alguna manera hemos logrado arrastrar un camino con la herramienta Pluma. Después de todo, parece que tenemos tres puntos de anclaje, uno en cada extremo y otro en el medio, con dos segmentos de ruta que los conectan. Sin embargo, si miramos un poco más de cerca, podemos ver que los puntos en cada extremo son un poco más pequeños que el del medio, y que en realidad tienen una forma diferente. El que está en el medio es cuadrado y, como hemos visto, un punto de anclaje es cuadrado, pero los que están en cada extremo parecen tener forma de diamante. ¿Algunos puntos de anclaje son cuadrados y otros tienen forma de diamante?
No Todos los puntos de anclaje son cuadrados, y todos son del mismo tamaño, lo que significa que esos puntos más pequeños con forma de diamante en los extremos no son puntos de anclaje. Y si no son puntos de anclaje, eso significa que las líneas no son segmentos de ruta, ya que necesitamos al menos dos puntos de anclaje para crear una ruta y en este momento el único punto de anclaje que tenemos es el que está en el medio. Entonces, ¿qué son exactamente esas líneas que se extienden desde el punto de anclaje? Son manijas de dirección!
"¡Ah, la dirección maneja!" tu dices. "¡Ahora lo entiendo!"
… … …………….
"Espera, no, no lo hago. ¿Qué diablos son manijas de dirección?"
Los manejadores de dirección son, bueno, manejadores, y se usan solo cuando se crean segmentos de trayectoria curva. No hay necesidad de controles de dirección al crear segmentos de ruta rectos. Por lo general, hay dos, aunque a veces solo hay uno, y como ya hemos visto, se extienden desde los puntos de anclaje. Se llaman "manijas" porque, como veremos en un momento, puedes agarrarlas y moverlas.
Las manijas de dirección controlan dos cosas. Controlan el ángulo de la curva, y controlan la longitud de la curva, y lo hacen de una manera muy clara. La razón por la que generalmente hay dos de ellos es porque uno de ellos controla el ángulo y la longitud de la curva que llega al punto de anclaje, y el otro controla el ángulo y la longitud de la curva que fluye desde el punto de anclaje.
Antes de ver cómo dibujar curvas con los tiradores de dirección, veamos primero cómo controlar los tiradores, ya que nuestro éxito con el dibujo de curvas dependerá mucho de nuestra capacidad para controlar los tiradores. No se preocupe, no es, como dicen, ciencia espacial. Solo hay algunas cosas simples que debes aprender. Ya hemos visto cómo crear manejadores de dirección, haciendo clic con la herramienta Pluma y luego arrastrándolos fuera del punto de anclaje. Cuanto más lejos del punto de anclaje arrastremos, más largos serán los controles de dirección. Cuanto más largo es el mango, más larga es la curva. Mango corto, curva corta. Mango largo, curva larga.
Una de las cosas buenas que aprenderá bastante rápido acerca de la herramienta Pluma es que es extremadamente indulgente. ¡No hay ninguna razón para preocuparse por hacer las cosas bien la primera vez cuando dibujamos caminos con él porque podemos regresar y arreglar las cosas fácilmente cuando hayamos terminado! ¿Colocaste un punto de anclaje en el lugar equivocado? ¡No hay problema! ¡Solo muévelo donde lo necesites! Veremos cómo hacerlo en un momento. ¿Arrastraste un controlador de dirección en la dirección incorrecta? No es un problema. Tome el mango y gírelo en la dirección que necesita. Nuevamente, veremos cómo hacer eso. ¿Alguna de sus direcciones es demasiado larga o demasiado corta? No hay problema. Simplemente haga clic en él y luego arrástrelo más largo o más corto según sea necesario (sí, también veremos cómo hacerlo). Las rutas son totalmente editables en todo momento, por lo que no hay absolutamente ninguna razón para preocuparse por cometer un error o corregirlo la primera vez. ¿Eso no te hace sentir un poco mejor ya?
Manijas de dirección giratorias y de redimensionamiento
Como mencioné, se llaman "manijas" de dirección porque puedes agarrarlas como manijas y moverlas. Veamos cómo hacer eso. Primero, veremos cómo rotar ambas manijas al mismo tiempo. Usando el punto de anclaje y los dos controladores de dirección que ya hemos creado, mantenga presionada la tecla Ctrl (Win) / Comando (Mac). Verá que el ícono de la herramienta Pluma se convierte temporalmente en el ícono de la Herramienta de selección directa (la flecha blanca), y eso se debe a que con la Herramienta de pluma seleccionada, mantener presionada la tecla "Ctrl / Comando" se convierte en un atajo rápido para acceder temporalmente a la Herramienta de selección directa lo que usamos para seleccionar diferentes partes de nuestro camino. Luego, simplemente haga clic directamente en la pequeña forma de diamante al final de cualquiera de los controladores de dirección (hacer clic en la "línea" en sí no funcionará, por lo que siempre debe hacer clic en la forma de diamante al final de un controlador para hacer cualquier cosa con él) y arrástrelo alrededor del punto de anclaje para rotarlo. A medida que gira uno de los mangos, el otro mango gira junto con él en la dirección opuesta, algo así como una sierra. También puede notar que tan pronto como comience a arrastrar el controlador, el ícono del cursor del mouse cambiará nuevamente, esta vez en el ícono Mover herramienta, ya que estamos moviendo algo de un lugar a otro:
Mantenga presionadas las teclas "Ctrl" (Win) / "Comando" (Mac) y haga clic en el extremo de cualquiera de los controladores de dirección, luego arrastre el controlador para girarlo alrededor del punto de anclaje. A medida que arrastra un controlador, el otro gira en la dirección opuesta.
Puede soltar la tecla "Ctrl / Comando" una vez que haya comenzado a arrastrar el controlador. No es necesario mantenerlo bajo todo el tiempo.
Para cambiar el tamaño de un controlador de dirección mientras lo gira, simplemente arrastre el extremo del controlador hacia el punto de anclaje para acortarlo o arrástrelo lejos del punto de anclaje para alargarlo. Como mencioné anteriormente, un mango más corto hará que la curva sea más corta, y un mango más largo hará que la curva sea más larga. Sin embargo, no puede cambiar el tamaño de ambos controles al mismo tiempo, por lo que si necesita cambiar el tamaño de ambos, deberá arrastrar cada uno más o menos por separado. Lo único que puede hacer a ambos al mismo tiempo es rotarlos. Si ya ha soltado el botón del mouse después de girar las manijas y el cursor ha vuelto a cambiar al ícono de la herramienta Pluma y necesita cambiar el tamaño de una de las manijas, deberá mantener presionada la tecla "Ctrl / Command" una vez más para temporalmente vuelva a la Herramienta de selección directa y luego haga clic y arrastre el extremo del controlador para cambiar su tamaño:
Arrastre los extremos de los tiradores hacia el punto de anclaje para acortarlos, o arrástrelos lejos del punto de anclaje para alargarlos.
Ahora veamos cómo rotar los mangos independientemente uno del otro. To rotate one handle without affecting the other one, first release your mouse button if you've been rotating or resizing the handles so your cursor changes back into the Pen Tool icon. Then, instead of holding down "Ctrl/Command", which moves both handles at once, hold down your Alt (Win) / Option (Mac) key and click on the end of either of the direction handles. You'll see your cursor change into the Convert Point Tool icon, which looks like a simplified arrow made of only two lines, almost like an upside down letter "v" (except that it's not quite upside down). Then, simply drag the handle around the anchor point to rotate it, just as you did before, and this time, the handle will rotate independently of the other one, breaking the connection between them:
Hold down "Alt" (Win) / "Option" (Mac) and click on the end of either of the direction handles, then drag the handle to rotate it around the anchor point independently of the other handle.
Again, you can release your "Alt/Option" key after you've started dragging. You don't have to hold it down the whole time.
You can also resize direction handles using the "Alt/Option" key in exactly the same way as you can with the "Ctrl/Command" key. If you're in the process of rotating a handle, simply drag it in towards the anchor point to make it shorter or away from the anchor point to make it longer. If you've already released your mouse button and your cursor is showing the Pen Tool icon again, you'll need to hold down "Alt/Option" once again, then click on the end of the handle and drag it to resize it.
Is there a difference between resizing the handles using "Ctrl/Command" and using "Alt/Option" to do it? Sí hay. If you haven't yet "broken the connection" between the handles by dragging one independently of the other, resizing a handle using "Ctrl/Command" will keep the handles connected together. It won't resize both handles at once, but it won't break the connection between them either so you'll still be able to rotate them together if you need to. If you resize a handle using "Alt/Option", you'll break the connection between the handles. Even if you don't rotate the handle as you're resizing it, the connection will still be broken.
What if you've broken the connection between the handles by rotating them using "Alt/Option" and then want to rotate them together again? Can you "rebuild the connection", so-to-speak, by selecting one of them while holding down "Ctrl/Command" as before? Good question, and the answer is no. Once you've broken the connection between the handles, the "Ctrl/Command" key on its own won't bring it back. You'll need to select one of the handles while holding Ctrl+Alt (Win) / Command+Option (Mac) at that point in order to move the handles together again.
Quick Summary So Far …
We've covered a lot of information here about working with direction handles, so before we move on and start drawing some actual curves, let's do a quick recap:
- To add an anchor point, simply click with the Pen Tool.
- To add an anchor point with direction handles extending out from it, click with the Pen Tool, then drag away from the anchor point before releasing your mouse button. The further you drag, the longer the direction handles will be.
- To rotate the direction handles together, hold down Ctrl (Win) / Command (Mac), which will temporarily switch you to the Direct Selection Tool, then click on the end of either handle and drag it around the anchor point. The other handle will rotate in the opposite direction.
- To rotate the direction handles independently, hold down Alt (Win) / Option (Mac), which will temporarily switch you to the Convert Point Tool, then click on the end of either handle and drag it around the anchor point. The other handle will not rotate.
- To resize handles without breaking the connection between them, hold down Ctrl (Win) / Command (Mac) to switch to the Direct Selection Tool, then click on the end of either handle. Drag it towards the anchor point to make it shorter, or drag it away from the anchor point to make it longer.
- To resize handles and break the connection between them, hold down Alt (Win) / Option (Mac) to switch to the Convert Point Tool, then click on the end of either handle. Drag it towards the anchor point to make it shorter, or drag it away from the anchor point to make it longer.
- To rotate the direction handles together after breaking the connection, hold down Ctrl+Alt (Win) / Command+Option (Mac), then click on the end of either handle and drag it around the anchor point. The other handle will once again rotate with it.
Okay, that pretty much covers the basics of how to control the direction handles. Let's see how we can use them to draw some curves!
We've covered a lot of ground so far. We know about anchor points and direction handles. We know that in order to draw straight path segments, all we need to do is lay down a series of anchor points wherever we need them simply by clicking with the Pen Tool, and as we add more and more anchor points, we add more straight sections to our path. We know how to create direction handles and how to rotate them, either together or separately, and how to resize them.
We know how to turn a path into a selection by clicking on the "Load path as selection" icon at the bottom of the Paths palette or by simply pressing "Ctrl+Enter" (Win) / "Command+Return" (Mac) on the keyboard. One thing I didn't mention yet is that regardless of whether our path consists of straight lines,
curves, or a combination of straight lines and curves, converting it into a selection is done exactly the same way, and we've already learned how to do it, which means we're well on our way to mastering making selections with the pen! All we need to do is get a bit of practice drawing curves, which is exactly what we're about to do!
¿Todavía desplazándote? ¡Descargue este tutorial en PDF!
Drawing A Curve
Let's once again start fresh, either by opening up a new blank document in Photoshop or by deleting what you've already done. We're going to draw our first curve so we can put all of our newly-aquired direction handle knowledge to use. First, with the Pen Tool selected and the Paths option selected in the Options Bar, click once somewhere in your document to add an anchor point. Just click, don't click and drag. You should have one single anchor point on the screen when you're done.
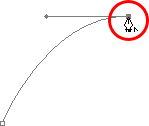
Then, move your mouse cursor up and to the right of your initial anchor point. Click again to add a second anchor point, but this time, drag your mouse a little to the right of the anchor point to drag out direction handles. Hold down Shift as you drag to constrain your movement to a horizontal direction. As you drag out the direction handles, you'll see your path appearing as a curve between the two anchor points! The further you drag your mouse, the longer you make the direction handles, and the more of a curve you create:
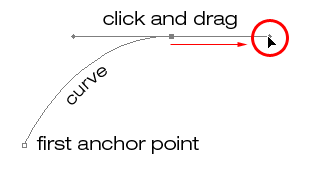
Click once to add an anchor point, then click and drag out a second anchor point with direction handles, creating a curved path segment between the two points.
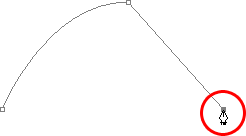
Click down and to the right of the second anchor point to add a third anchor point. This time, don't click and drag, just click:
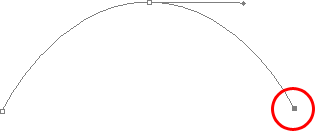
Add a third anchor point down and to the right of the second one by clicking with the Pen Tool.
As soon as you add the third anchor point, a second path segment will appear, joining the second anchor point with the third one. And because our second anchor point has direction handles extending from it, this new path segment is also curved! We now have a nice, smooth arc starting from the first point on the left, then passing through the anchor point with the direction handles up top, and coming to an end at the third point.
One thing you may have noticed, and you can see it in the screenshot above, is that when you added the third anchor point, the direction handle extending out the left side of the second anchor point disappeared. It's still there, Photoshop simply hid it from view. To see it again, use the keyboard shortcut we've already learned to temporarily switch to the Direct Selection Tool, which is by holding down the Ctrl (Win) / Command (Mac) key, and then click on the second anchor point to select it. As soon as you do, the missing direction handle reappears as if it was there the whole time (which it was):

Hold down the "Ctrl" (Win) / "Command" (Mac) key to temporarily switch to the Direct Selection Tool, then click on the top anchor point to select it. The missing anchor point reappears.
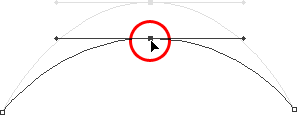
With your "Ctrl/Command" key still held down so you still have access to the Direct Selection Tool, try resizing each direction handle by clicking on the end of each one to select it and then dragging it towards and away from its anchor point. Again, hold "Shift" as you drag to constrain your movement horizontally, and watch what happens. As you increase the length of a handle, you get more of a curve, and as you decrease its length, you get less of a curve. Also notice that each handle controls its own side of the curve. The handle on the left controls the curve coming into the anchor point from the left, and the handle on the right controls the curve flowing out from the anchor point on the right.
Here, I've made my handle on the left shorter, and as we can see, there's much less of a curve now than there was originally, almost becoming a straight line. I've also made the handle on the right longer, and as a result, the curve on the right is now much more pronounced. The faint curve is the original for comparison:
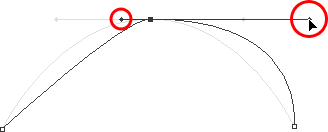
Change the shape of the curves by resizing the direction handles. The left handle controls the left curve, and the right handle controls the right curve.
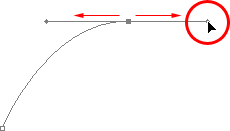
I'm going to undo my changes by pressing Ctrl+Alt+Z (Win) / Command+Option+Z (Mac) a couple of times to set my direction handles back to their original sizes so they're equal length once again. Now let's try rotating the handles. Hold down "Ctrl/Command" once again to access the Direct Selection Tool, then click on the end of either handle to select it and try rotating it around the anchor point. Since we selected the handle with "Ctrl/Command", both handles rotate together. Here I've dragged my left handle down and to the right, and the angle of the curve on the left changed along with it, now appearing as more of a slope as it rises up towards the anchor point. By dragging the left handle down and to the right, I caused the right handle to rotate up and to the left, and again, the angle of the curve on the right changed along with it, now rising above the anchor point briefly before making a steep decent down to the anchor point on the right. Again, the faint curve is the original for comparison:
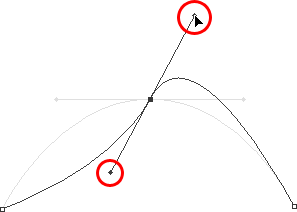
Rotate the direction handles to change the angle of the curves. Select a handle while holding "Ctrl" (Win) / "Command" (Mac) to rotate both handles together.
The Dreaded "Loop"
One thing you want to avoid is rotating the handles too far, which will cause your path segments to overlap and create loops. Here, I've rotated my handles all the way around so that the left handle is now on the right and the right handle is on the left, and notice what's happened. My path segments are now overlapping each other, creating a loop:
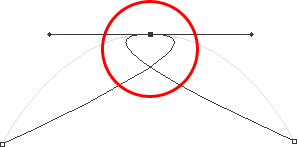
Rotating the direction handles too far causes the path segments to overlap, creating an unwanted loop in the path.
Loops can be caused by rotating the direction handles too far, as I've done above, but more often than not, they're caused by a handle being too long, making the curve too long and causing it to overlap with itself. If that happens, which it does sometimes as you're drawing a path, simply shorten the length of the direction handle. Most people end up creating a whole bunch of loops in their path when they first start working with the Pen Tool, so don't think you're the only one. No need to panic or become frustrated though. As I said, the problem is most likely being caused by a direction handle being too long, and all you need to do is shorten the handle to "un loop" the loop!
I'm going to press Ctrl+Alt+Z (Win) / Command+Option+Z (Mac) a few times once again to undo my changes and reset my path back to the nice smooth arc I started with. Now, what about rotating the direction handles independently of each other? As we learned on the previous page, to rotate the handles separately, instead of selecting them with "Ctrl/Command", we simply select them while holding down Alt (Win) / Option (Mac), which gives us temporary access to the Convert Point Tool. Click on the end of a handle to select it, then drag it with your mouse to rotate it and this time, the other handle will stay in place, breaking the connection between them.
Here, I've selected the handle on the right while holding "Alt/Option" and then rotated it down and to the left. Notice how once again, the angle of the path segment on the right changes to match the new direction of the handle, and this time, the handle on the left, along with the path segment on the left, both stay in place. My path now looks a bit like a shark fin:
Hold down "Alt" (Win) / "Option" (Mac) to temporarily access the "Convert Point Tool", then click on the end of a direction handle to select it and rotate it independently of the other handle.
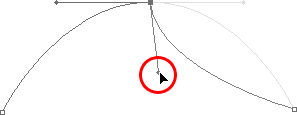
Moving An Anchor Point
One thing we haven't looked at yet is how to move an anchor point. If you recall, I mentioned on the previous page that the Pen Tool is extremely forgiving, and one of the reasons for it, besides being able to rotate and resize our direction handles after we've created them, is that we can easily move anchor points from one spot to another if we need to. As we've already learned, anchor points anchor a path into place. The anchor points themselves, however, are not anchored into place. You can move an anchor point anywhere, anytime, and any path segments that are connected to it will move and adjust right along with it.
To move an anchor point, hold down Ctrl (Win) / Command (Mac) to temporarily access the Direct Selection Tool as we've already been doing, then simply click on the anchor point to select it and drag it to its new location with your mouse. Any path segments connected to it will move with it to the new location. Here, I've dragged my middle anchor point down a bit from its original location (again, the faint path marks the original location for comparison). Notice how the path itself has changed shape to adjust to the new location of the anchor point:
Hold down "Ctrl" (Win) / "Command" (Mac) and click on an anchor point to select it, then drag it to a new location. Any path segments connected to the point will move with it, changing shape as needed.
Normally, when outlining an object with a path to select it using the Pen Tool, you won't need to move to an anchor point quite as far as what I've done above, but it's very common to go back around your path after you've created it and nudge a few anchor points here and there to fine-tune the path. Once you've selected an anchor point, you can nudge it up, down, left or right using the arrow keys on your keyboard.
Combining Straight Paths With Curves
What if I didn't want both of my path segments to be curves? What if what I needed was for the first path segment to be curved, but the second one needed to be straight? Veamos cómo hacer eso. I'm going to delete my existing path and start over again. First, I'll click to add an anchor point to start things off. Then, just as before, I'll click to add a second anchor point up and to the right of my initial point, and this time, I'll drag out direction handles, which will create a curved path connecting the two points, giving me exactly what I had way up at the start of this page:
Click once to add an anchor point, then click to add a second anchor point and drag out direction handles to create a curve.
I now have my initial curve, but I want my next path segment to be straight. If I was to simply click somewhere to add another anchor point right now, I would get another curve because I have that direction handle extending out from the right side of the last anchor point I added. What I need to do is get rid of that one direction handle. Without a direction handle controlling the angle and length of a curve, we get a straight line.
To remove the handle, leaving only the handle on the left of the anchor point, all I need to do is hold down Alt (Win) / Option (Mac), which will again temporarily switch me to the Convert Point Tool, and then I just click directly on the anchor point. When I do, the direction handle on the right disappears, leaving only the one on the left:
Hold down "Alt" (Win) / "Option" (Mac) and click directly on the anchor point to remove the direction handle on the right, leaving only the one on the left.
Now, with the direction handle gone, if I click to add a new anchor point, I get a straight path segment between the two points :
With the direction handle on the right now gone, clicking to add a new anchor point adds a straight path segment between the two points.
I now have a curved path segment on the left and a straight one on the right! What if I wanted the exact opposite? Suppose I needed to start with a straight path segment and then follow it with a curve? To do that, first I'll start by clicking to add an initial anchor point. Then, since I want a straight path segment, all I need to do is click somewhere else to add a second anchor point, and I automatically get a straight path connecting the two points:
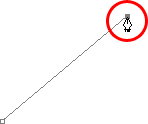
Click with the Pen Tool to add an initial anchor point, then click again somewhere else to add a second anchor point and create a straight path segment between them.
I'm going to keep my mouse button held down after clicking to add my second anchor point because I want my next path segment to be curved, and we know that in order to create a curve, we need a direction handle. To add a handle extending out from the right of my anchor point, I'm going to hold down Alt (Win) / Option (Mac), and with my mouse button still down, I'm simply going to to drag to the right of the anchor point. As I do, a direction handle will drag out along with it:
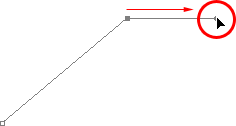
Hold down "Alt" (Win) / "Option" (Mac) and drag out a direction handle on the right of the anchor point.
Notice that the direction handle extended only from the right of the anchor point, not from both sides, leaving my straight path segment on the left in place. And now that I have my direction handle on the right, all I need to do to create my curve is click to add a third point:
Click to add a third anchor point, which creates a curved path segment between the previous anchor point and the new one.
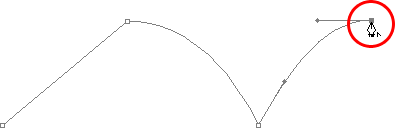
And there we go! I now have a straight path segment on the left, followed by a curved segment on the right. Of course, most paths you draw are going to consist of more than just three anchor points. Let's say I wanted to continue this path, moving in the same general direction towards the right, and I want my next path segment to be curved as well. Just as I did a moment ago, I would leave my mouse button held down after clicking to add my third point. I would hold down Alt (Win) / Option (Mac) and I would drag out another direction handle. So far, we've only been dragging handles out towards the right, but what you really want to do is drag your handles out in the general direction you want the curve to follow. I want to create a curve that goes up and to the right, so I'm going to drag out a small handle in that same general direction:
Drag out your direction handles in the general direction of the curve.
¡Propina! A good practice to get into is to keep your direction handles small when first dragging them out, since you never really know how long or at what exact angle they need to be until the actual curve appears, and the curve doesn't appear until you've added both of its anchor points. Once you've added both points and the curve appears, you can easily go back and make any adjustments you need to the handles. You may even want to wait until you've drawn the entire path before worrying about adjusting the handles.
With my direction handle created, I'm going to click to add a fourth anchor point, and I'm going to drag out direction handles from it as well:
Adding a fourth anchor point along with direction handles extending from it.
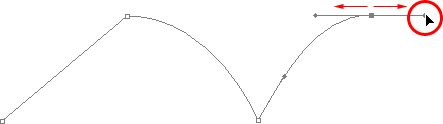
I now have a third segment added to my path, this one being a curve. Notice that this curve actually has two direction handles controlling it, one extending from the right of my third anchor point and one extending from the left of my fourth point:

The third path segment now has two direction handles, one on either end, working together to control the curve.
The overall shape of this curve is now being controlled by the length and direction of both of these handles. Watch what happens to the curve when I move the handles. I'll drag the bottom handle down and to the right, and I'll drag the top handle up and to the left. I'll also drag both of these handles longer. The faint curve is the original for comparison:
Changing the direction and/or length of either handle changes the overall shape of the curve. After rotating and lengthening both handles, the curve now appears in an "S" shape.
The curve is now a bit "S" shaped, and that's because the bottom handle is controlling the angle and length of the curve as it flows out from the third anchor point, while the top handle is controlling the angle and length of the curve as it flows into the fourth point. Changing the length and/or direction of either handle will change the overall shape of the curve.
I'm going to press Ctrl+Alt+Z (Win) / Command+Option+Z (Mac) a couple of times to undo the changes I made, so the curve is once again in a simple arc shape as it was a moment ago, and I think I'll finish off this path with another straight segment, which means I'll need to remove that direction handle extending out from the right side of the fourth anchor point. We've already learned how to do that, by holding down Alt (Win) / Option (Mac) and clicking directly on the anchor point itself:
Hold down "Alt" (Win) / "Option" (Mac) and click directly on the anchor point to remove the direction handle on the right.
With the direction handle gone, all I need to do now to add a straight path segment is click to add another anchor point:
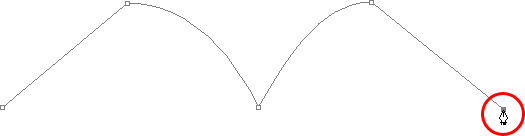
The direction handle on the right is now gone, so we can add a straight path segment simply by clicking to add another anchor point.
We could continue this path for as long as we wanted, adding more straight segments and curves, but I think we'll stop here because we've pretty much covered everything we need to know about drawing paths with the Pen Tool at this point. That was a lot of information to take in, especially if this is your first time learning about paths. As I mentioned at the beginning, you won't become a Pen Master simply by reading through this tutorial, just as you won't learn how to ride a bike, or drive a car, learn to swim, or play the piano simply by reading about it. But hopefully you have some sense at this point of how to draw paths with the Pen Tool, how to draw straight path segments, how to draw curves by dragging out direction handles, how to change the length and angle of the curve by rotating and resizing the handles, and how to combine straight and curved segments in a path.
To finish off our look at making selections with the Pen Tool, let's see a practical example of how to select an object with curves.
Here, we have a photo of a couple of dolphins leaping out of the water. Definitely a couple of very curvy creatures:

A photo of two dolphins jumping out of the water.
Let's say we want to select these dolphins so we can use them for a design or a collage, or whatever the case may be. If you were to try selecting them with the Lasso Tool, which is most likely what you would end up using if you didn't know how to use the Pen Tool, not only would you have a tough time, you'd have an even tougher time trying to convince yourself that you were happy with the results when you were done. The reason is because the Lasso Tool simply isn't capable of making curved selections very well. The biggest problem with it, besides being a pixel-based selection tool, is that it relies on you having a steady enough hand to move it smoothly around the curves. Even if you don't suffer from a caffeine addiction, you could drive yourself crazy trying to draw a perfectly smooth curve with your mouse, or even with a pen tablet, and when you've finally given up, you'll still be left with a selection full of rough, jagged edges that just scream "amateur!". No one likes to be called an amateur, especially when there's no need for it thanks to the Pen Tool!
Examine The Object First
Whenever you're about to select something with the Pen Tool, before you begin, take a moment to examine the object carefully to get a sense of where you're going to need to place your anchor points. Forget about all the details in the object and focus only on its shape. Where are the areas where the shape changes direction? Which parts of the shape are straight? Which parts are curved? If there's a curve, is it a smooth, continuous arc or does the angle change at a spot along the curve? Visualize in your mind where you're going to need to place your anchor points, because when you place one, you always want to be thinking about the next one and what the path segment between the two points needs to look like.
A Tool Of Elegance
One more thing to keep in mind is that the Pen Tool is meant to be a tool of elegance . It's not a nail gun or a staple gun. You don't want to just go clicking around your shape adding anchor points all "willy nilly" (that's a technical term). When using it to draw curves, you want those curves to be nice and smooth, otherwise we might as well just stick with the Lasso Tool. To keep the curves flowing smoothly, we need to limit the number of anchor points we use to create them. That's why you want to take a moment to examine the object first and visualize where the anchor points need to be. If you can outline a large section of the shape using only one curve with an anchor point on either end, that's what you want to do, because that's what's going to give you the kind of results you're looking for. The kind of results that scream "definitely not an amateur!".
Let's select these dolphins. I'm going to start my path in the middle of the photo, at the spot where the side of the dolphin on the left overlaps the rear flipper of the dolphin on the right. There's no right or wrong place to begin a path. This is just where I've decided to start. The first part of that rear flipper is straight, so since I don't need a direction handle to create a straight path segment, I'm simply going to click once with my Pen Tool to add my first anchor point, which will serve as the starting point for my path:
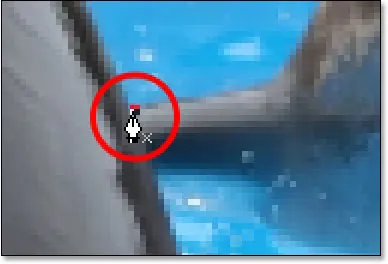
Adding the first anchor point.
As I mentioned earlier, you'll probably find it helpful to zoom in on your image as you're drawing your path. To scroll the image around on the screen as you're zoomed in, hold down the spacebar, which will switch you temporarily to the Hand Tool and allow you to move the image around on the screen by clicking and dragging it.
The top of that flipper actually has a slight curve to it as it approaches the dolphin's tail section, so for my second anchor point, I'm going to click at the point where the flipper and tail section meet, and I'm going to drag out short direction handles, dragging up and to the right in the direction that the tail section is moving. Notice that I've now created a slight curve along the flipper:
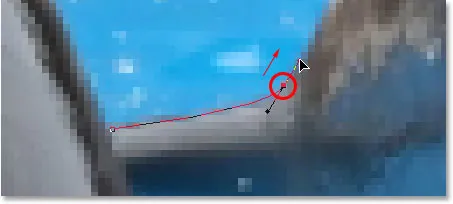
Adding the second anchor point and dragging out small direction handles to add a slight curve to the first path segment.
As I continue up along the tail, I can see that it stays straight for a short distance, followed by a curve to the right, so I'm going to click to add a third anchor point at the spot where the curve begins. This gives me a straight path segment between the previous point and the new one. I know there's a short direction handle extending out from the previous anchor point, which normally means that my new path segment will be a curve, not a straight section, but because the handle is so short and is also moving in the same direction as the path segment, there is no noticeable curve to it. Consider it a "mostly straight" path segment:
Clicking to add the third anchor point, creating a (mostly) straight path segment.
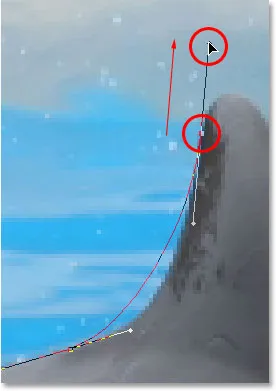
Continuing along, we come to the first real curve in our path. For this, I'm going to need to drag out a direction handle from the anchor point I just added, so I'm going to hold down Alt (Win) / Option (Mac), then drag out a handle in the general direction where I want the curve to flow as it starts. Notice how I'm only dragging out a handle from the one side of the anchor point, not both:
Hold "Alt" (Win) / "Option" (Mac) to drag out a direction handle from one side of an anchor point.
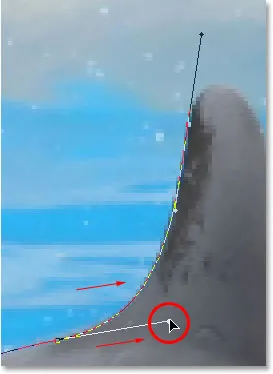
To add the curve, I'll click and drag at the spot where the curve ends, shaping the curve as I drag out the handles until it matches the curve of the dolphin's tail. If I needed to, I could also go back and change the length and direction of the handle at the start of the curve to fine-tune it, but in this case, I don't need to do that:
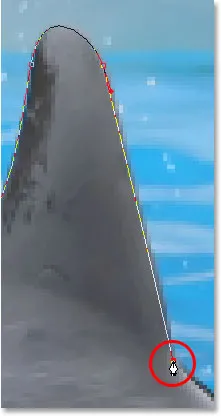
Adding an anchor point at the opposite end of the curve and dragging out direction handles from it, rotating and resizing them as needed until the curve matches the curve of the object.
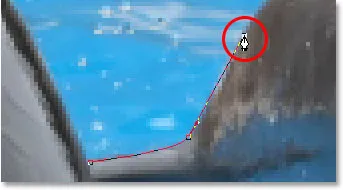
The next area of the dolphin is pretty straight, right up until its back begins to merge with its dorsal fin, at which point there's another curve, so I'm going to click to add an anchor point just before the curve up the dorsal fin begins, which is going to give me another "mostly straight" path segment between the previous point and the new point. Then I'm going to once again hold down Alt (Win) / Option (Mac) and drag out a direction handle as I prepare for my next path segment which will be curved:
Click to add an anchor point, then hold down "Alt" (Win) / "Option" (Mac) and drag out a direction handle to prepare for the next path segment.
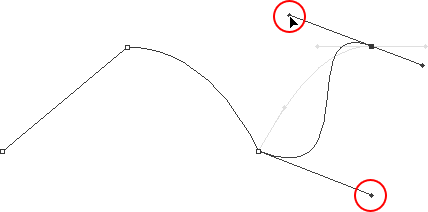
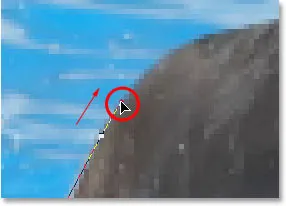
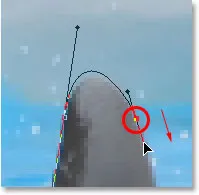
The left side of the dorsal fin consists mainly of one continuous curve upward until it gets near the very top, at which point the shape changes, so to create this curve, I'm going to click and drag at the point near the top where the curve will change direction. As we can see in the screenshot, this adds a curved path segment between the previous anchor point and the new one, but the curve is not yet following along the shape of the fin. It's going to need some fine-tuning:
Adding a curve along the left side of the dorsal fin. The curve still needs some adjusting.
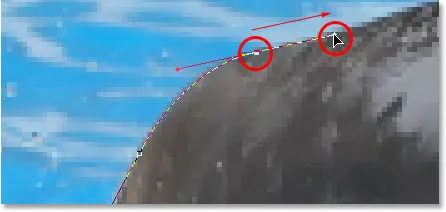
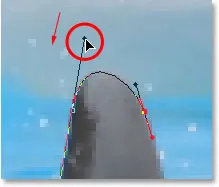
To adjust the curve, I'm simply going to hold down the Ctrl (Win) / Command (Mac) key, which gives me temporary access to the Direct Selection Tool, and I'm going to drag the handle extending out from the bottom anchor point towards the right to lengthen it, which is going to pull the angle of the curve in towards the right along with it, lining it up nicely with the curve of the fin. I've also rotated the top direction handles slightly in a clockwise direction just to be nit-picky, but the majority of the adjustment was done using the bottom direction handle:
Adjust the curve by adjusting its direction handles.
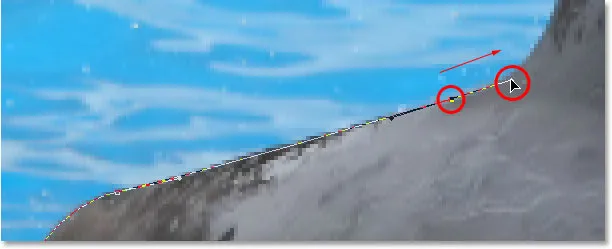
To add a curve around the top of the fin, I'll click and drag on the opposite side of it to add another anchor point with short direction handles. Notice though that we run into a bit of a problem. The direction handle on the left side of the curve is too long and it's pulling the curve away from the top of the fin:
The direction handle on the left of the curve is too long, resulting in the curve not following the shape of the fin.
To fix that, all I need to do is once again hold down Ctrl (Win) / Command (Mac), then click on the end of the handle to select it and drag it shorter until the curve is the proper shape:
Shortening the length of the direction handle to adjust the shape of the curve.
Let's finish creating our path around the dorsal fin. The remainder of the fin is basically a straight line, so I'm going to click at the base of the fin to add another anchor point which adds the straight path segment, completing our path around the fin:
Adding an anchor point at the base of the fin to finish drawing the path around it.
Since you and I would both be here all day if I was to continue commenting on every anchor point, direction handle and path segment as we make our way slowly around the dolphins, and since we've covered everything we need to know at this point, I'm going to go ahead and draw the rest of the path, outlining both dolphins:
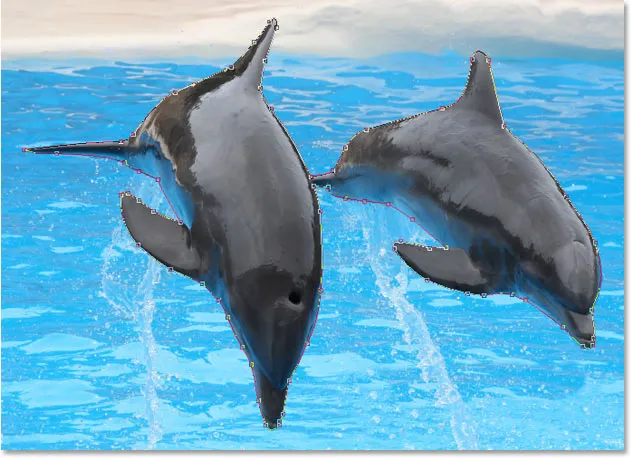
Both dolphins are now outlined by the path.
The dolphins have now been outlined with the path, and if we look at the Paths palette, we can see that sure enough, we have a path in the shape of the dolphins:
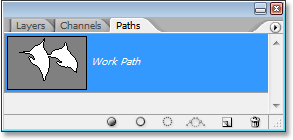
Photoshop's Paths palette showing the outline of the dolphins in the preview thumbnail.
As we've learned, Photoshop automatically names the path "Work Path", which means it's temporary and will be replaced if we start a new path. If you wanted to save it, you would need to double-click on the name "Work Path" and rename it to something else, like "Dolphins" in this case. I'm not going to worry about that, since I have no need to save it. All I want to do at this point is convert my path into a selection, and since I'm already in the Paths palette, I'll do that by clicking on the Load path as selection icon at the bottom of the palette:
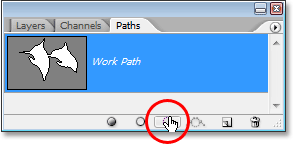
Clicking the "Load path as selection" icon at the bottom of the Paths palette.
I could also have used the keyboard shortcut Ctrl+Enter (Win) / Command+Return (Mac) . Either way converts my path into a selection, and if I look at my photo, I can see that my path has indeed become a selection around the dolphins:

The path around the dolphins has now been converted into a selection.
A dónde ir después …
¡Y ahí lo tenemos! The dolphins are now selected and ready for whatever plans we have for them. And with that, we wrap up our look at drawing paths and making selections with the Pen Tool in Photoshop! Para obtener más información sobre las herramientas de selección de Photoshop, consulte nuestra sección Cómo hacer selecciones en la serie de Photoshop. ¡Visite nuestra sección Conceptos básicos de Photoshop para obtener más temas de Photoshop!